Friday, June 14, 2013

Hoopla

If you are like me an spend hours looking at pictures of amazing cards on the www you will have created a library of ideas you would love to try. The idea I have been desperate to try is that using an embroidery hoop and have a wee collection of them in my stash...I picked up this one in a local pound outlet.


The products I used from Marianne Designs and Crafter's Companion are:

Dies: Marianne Design Creatables - Anja's Vintage Decoration
Folders: Embossalicious Regency Damask 8 x 8
Stamps: Marianne Design Stamps - Romantic Vintage (CS0869)
Embellishments: Marianne Design Charms - Happy Days (JU0893) & Marianne Design Text Ribbon - Roses are Red (JU0897)

Tune into Create and Craft TV on Sunday 16th June at 12 noon for more products and samples.

I started by deciding on my colour pallete...I wanted pinks and pale turquoises but I didnt have any backing papers in my stash that I liked! But I did remember I had a little packet of gorgeous printed paper tissues (the iosh kind you keep in your designer handbag) that would be perfect. So I took the backing ply and left the top patterned ply. I selected a light weight piece of white card and coated it with a very thin layer of PVA glue and very gently and carefully added the tissue layer to the card and smoothed out wrinkes as I went. Once that had dried I then went over the top with a couple of thin coats of PVA glue. Once that was dry - PLEASE, PLEASE make sure it is dry - passed it throught my Embossalicious Regency Damask folder. I then did as I would with a piece of material and added the hoops.

I die cut th Anja's Vintage Decoration die in white velum and pressure embossed, and before I took it out of the die I used it as a stencil with my Victorian Velvet Tim Holtz. Added a few little white pearls. I placed this at the bottom section of the hoop and attached.


I laid 3 layers of pink ruffles ribbon and let it over hand the edges and left the edges frayed.

I cut a length of the Roses are Red text ribbon slightly longer than the width of the hoop and attached a length of florestry wire to the back of it. The purpose of the wire was to let me bend and ribbon into shape. I used by Collall glue to attach this to the hoop.

The stamp was stamped in pink Momento ink and I added a spinkling of clear and white embossing powders and heated. Coloured the image with my alcohol pens and water colours. I tore around the square frame of the stamp and aged with distress inks.


From my stash I slelected a large cream and large pale pink rose but painted the leaves with my water colours to give more colour and shade.

I recently purchased from a stall (Vintage Lillac) at a Craft Fair some gorgeous vintage fabrics. The loveky lady on the staff was also selling buttons she had covered her self and she kindly told me hoe to do it and have been desperate to have a go. This project was ideal for this so I selected a piece of material with beautiful Peony roses that co-ordinated perfectly with my colour palette. I made 3 in total,: 1 large and 2 small. One of the small buttons I used as the centre piece of the white bow and the other 2 I used as embellishments.

I coloured one of the charms from the pack with my pink alcohol pen.

I laid and looped 2 lengths of a fine string of pearls across the card and attached with my Collall silicon glue, again leaving the ends to over hang the edges of the hoop.


From my stash I added an off white tassell but I lightly inked the ends with Victorian Velvet from Tim Holtz.

As I started to build the project something was missing. I needed something to decorat behind the stamped image on the backing paper, but what....I know it needed a pearl swirl. So I set about dotting my design onto the backing paper which was card to see so I used my pokey tool. The it came to me, andit had been stareing me in the face all the time...I needed to embroider the swirls...so I used some deep pink embroidery thread and followed the design in a back stitch and then went back in again with the same colour thread and did a Whipped Running Stitch.


I so love how this turned out and am desperate to do another. I have a baby card to do an I think I will be using another hoop as the basis. Hope you like.

For more samples and products remember and tune into Create and Craft TV 12 noon on Sunday 16th June.


Romantic Vintage

The Romantic Vintage stamp from Marianne Design evokes a period of time gone past. From the samples made by the Crafter's Companion Design Team there are many differentr colour palettes you can use for this stunning image to create gorgeous cards and 3d projects.


For this card I used courtesy of Crafter's Companion:

Stamps: Marianne Design Stamps - Romantic Vintage - Thank You (CS0868)
Dies: Marianne Design Creatables - Anja's Vintage Decoration & Mariann Design Creatables Flourish (LR0118)
Embossing Folder: Embossalicious Regency Damask 8x8
Embellishment: Marianne Design Vintage Lace - Fleur (JU0898)

My backing papers chosen from my stash (vintage rose paper and grey gingham card) dictated the colour I chose to stamp the vintage inage in - antiqu browns. I stamped the image onto cream card and sprinkled a light patching dusting of clear powder and them some the same with vintage gold embossing powder and heated. This created a lovely blend of colours once heated. I then coloured the image with my water colour paints. Cut out the th round image by hand and cut a framed layer for it to sit on via my cricut machine and distressed with Tim Holtz Vintage Photo.


I matted and layered the card but added a piece of the gingham gret card on top of the vintage rose paper and hand stitched a small run of zig zag stitches near the top.

I die cut various flourishes in gold card and in brown Kraft card. Made some pearl flourishes.

Across the card I laid 2 lengths of vintage crochet ribbon and a length of antique gold frill.

The brown Kraft paper envelope at the back was made using the  Marianne Design Creatables - Anja's Vintage Decoratio die. I cut out the size of envelope I wanted but did not cut the top flap. I made the flap by adding my die and passing it through my die cutting machine and cut the side sections of the die  I did not need and folder over. I embellished the front of the die cutr envelope with small pearls. Inserted a small piece of calligraphy pattrened paper to the inside of the envelope.


As I started to buid the card it needed some flowers so I made some handmade roses from cream paper and colours with my distress inks and added a touch of gold ink to the edges of the petals. Attached a hand tied bow using the delicate Fleur Vintage Lace, also from Marianne.

Tune into Create and Craft TV on Sunday 16th June at 12 noon for more products and samples.

A Book of Cakes

The Apron die from Marianne Designs is such a fun die and for my first sample for Crafter's Companion I wanted to do something a little different. I have'nt done many albums but thought a little cute recipy book would be a novel way to use the die.


I used the following Marianne products, which are ALL available from Crafter's Companion:

  • Dies: Marianne Craftables - Apron (CR1246)
  • Embossing Folders: Die'sire Rose Garden 8 x 8 & Regency Damask 8 x 8
  • Papers: Coredinations Brights & Marianne Design Paper Bloc - Happy Days
  • Embellishments: Marianne Design Charms - Happy Days & Spectrum Noir Lights (set of 24)

I selected a card board scalloped love heart album and used a soft pink acylic paint and painted the back and front end, needed a couple of coats to ensure none of the scabby grey showed through.

Whilst that dries I set to the task of making my apron...


Cut the apron using the lovely turquoise and white spotted paper from the paper block. Used some pink and white washi tape and created a ruffle for the bottom of the apron and over laid with a piece of white ribbon. The lace trim on th large and small pocket was die cut in white velum and the smaller inner section of th pocket I made drawing round the inside of the 2 pocket dies with pencil and cut out with scissors. I attached these sections to the velum by hand with a needle and thread in a bright oink cotton. Four small white buttons where sewn with the same pink cotton and a bright pink thin ribbon was attached for the apron ties.


To create the backdrop for the apron I selected a delicate love hear shaped doillie. In my crafty stash I had a gorgeous cake and cake stand stamp. I stamped the image in black and coloured using my alcohol pens - I couloured the image in the same colours as the apron. Once I was happy with the coloured image I cut out. Now that I have the 3 main elements of the album cover (stamped image, doillie and apron) I splayed around with the positioning. Omce happy I glued them to the pink painted cover. I then embellished the cover further by:

  • cutting the work C A K E from deep turquoise Coredinations Brights with my cricut machine
  • adding pink and purquoise ribbon bows to the album rings
  • coloured wooden spoon, tea cup and tea pot wooden embellishments with my alcohol pens
  • addingsome paper and ceramic flowers
  • adding gems in various sizes and colours and the blender charm from the charm pack
Now for the inside...


I chose not to decorate all the pages of the recipy book as I wanted to leave pages blank for the recipient to write their favourite cake recipes in. So I chose 5/6 pages and decorated them. I cut love heart shapes in 2 sizes from my cricut machine in Coredinations card and from the paper block.

To decorate further I used:

  • washi tape
  • ribbon
  • cooking related embellishments from my stash
  • my embossing folders
  • paper flowers
  • wooden themed embellishments
just really go to town and add as much or as little embellishments as you like.

Keep popping in to see what I do next with the fabby Apron die from Marianne Designs and dont forget to tune into Create and Craft TV on Sunday 16th June at 12 noon for more products and samples.


A Piece of Cake

The cake die from Marianne Designs (available from Crafter's Companion) is such a versatile die and can be used for Birthdays, Weddings and Christening, depending on how you theme your card.


To make this card I used the following products, all available from Crafter's Companion:

  • Mariann Design, Pretty Paper Bloc - Happy Days (PK9095)
  • Coredinations Roy G Biv
  • Centura Pearl Snow White Accents
  • Marianne Design Collections - Cake (COL1322)
The first card I chose to make using this die was that of a simple female Birthday card. I adored the pink damask paper from the bloc along with the turquoise and white spot paper with the beautiful deep pink roses.

I cut the cake die from Centura Pearl Snow White Accent Paper. Cut the iceing in pink Coredinations from the Vintage stack and some in a pink irridescent paper I had in my stash. Once all the sections of the cake where die cut, I cut a small piece of card and used this as to build my make. Adding the layers with glue, bottom to top. I decorated the cake with pearls, coloured the candle and flame with alcohol pens and embellishmed with some plastic and paper bought flowers.

Rounded the corners of the pink damask matt and layered onto a piece of card that co-ordinated with the deep pink ross on the backing paper, rounded the corners also.

Before attaching the two layers together I cut 3 small lengths of white ribbon and looped and attached to the pink damask layer. Attached the deep pink matt to the back and added 3 deep pink small gems to the ribbon tabs.

The cake frame section of the card was attached to the backing paper, slightly overlapping a piece of white crochet ribbon and white satin ribbon that had been wrapped around the card.

To the bottom left hand corner I attached a large pink ribbon bow that co-ordinated with the deep pink elements of the card design and added a material covered button to the centre.


Made some bunting again, from the paper block with some white raffia.

The second card I made using this die was a very simple wedding card using:

  • Marianne Creatables, Anjas Vintage Decoration (LR0269)
  • Marianne Collectables, Cake (COL1322)
  • Marianne Design, Pretty Paper Bloc - Happy Days (PK9095)
  • Centura Pearl Snow White


This is a very versatile die and can be used for feminine cards and for those ghastly masculine cards we all struggle to make. This is a crfaty stash essential, get it before everyone else does.

A Spot of Gardening

I have a confession to make...when I set out to make another card using the lovely Apron die from Marianne Designs my aim was to create a masculine card...I failed. However, this is how it turned out.


For my 1st sample using this die I used a delicious pink and turquoise pallete so this time I wanted to go more rustic and earthy - ideal colour palette for a masculine card.

Here are the Marianne products I used from Crafter's Companion:

  • Die: Marianne Craftabls, Apron (CR1246)
  • Papers: Mariann Design Paper Block - Happy Days (PK9095)
  • Stamps: Marianne Design Collectables - Scallop Dies and Sentiments

The Apron was cut from canvas paper (which was white). I sued my ink pads in various shades of brown as set to making the canvas paper die cut look like hessian. I faux stitched round the edges with a fine pen. The large and small pocket I cut free hand as the pockets that come with the die are lacy and not suited. I again coloured them with my ink pads and faux stitched edges also. Used the button elements of the dies and cut in brown card. From a piece of patchwork patterned paper I cut a rough small square and sewed it onto the large apron my hand - I wanted it to look like a patch. I built the apron by attaching thin brown ribbon for the apron ties with 4 very small brass effect brads from my stash. Glued the pockets on and added a small piece of twine and a little rose bud to the large pocket.


The backing paper is from the paper block and I used my distress inks to 'dirty' up the page.

From my crafty stash I had a bag of material leaves and I coloured them with my alcohol pens. Also in my stash I had a seed packet that I used in a previous sample (http://peonyandtwine.blogspot.co.uk/2013/05/edwardina-lady-and-natures-notes-sneeky.htmlhttp://peonyandtwine.blogspot.co.uk/2013/05/edwardina-lady-and-natures-notes-sneeky.html)

I used Kraft card as the card basis and layered the apron, leaves and seed packet onto the backing paper.

The sentiment is from the stamp pack and was stamped in a rustic orange ink and I added clear embossing powder and cut out by hand.

This is really where I should have left it, BUT it just didnt look or feel right...something was missing...more embellishments. So I could'nt help myslef and I just HAD to add a ltttle twine bow and some little shop bought flowers...


Althoughts it didnt end up being the masculine card I wanted it to be I dont think it's too feminine. To make it more masculine rather than add flowers I could of added more leaves, but hay ho I did'nt.

Tune into Create and Craft TV on Sunday 16th June at 12 noon for more products and samples.

Wednesday, June 12, 2013

Cup of Delights

Over the past few days I have been previewing samples that I have been busying myself making for Crafter's Companion who are now proud stockist of Marianne Design products. I have been itching to show you my final project. I have already previewed the samples I made using the 1950's inspited Kitchen stamps, backing papers etc but I was desperate to do this project that I had in my mind...


From the vast array of Marianne products available from Crafter's Companion I used:

  • Dies: Die'sire Scalloped Tags, Die'sire Sunflower small and large & Die'sire Rose small and large
  • Stamps: Marianne Design Stamps - Fabulous Fifties - Kitchen (CS0870)
  • Papers: Marianne Design Paper Block - Happy Days (PK9095)
I purchased the cup and saucer from a high street store and set about decorating.


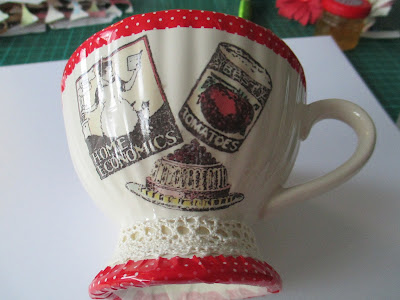
I have never decorated anything ceramic so I did some crafty research on the www and found that decall paper was the way to go - not going to go into detail here as there is lots on the www of how to do's. I stamped the images I liked from the Fabulous Fifties set and coloured with my acohol pens. I then scanned the images into my pc and printed onto the decall paper, soaked in water and attached to ceramic. The reason I stamped and scanned was that I was'nt sure how stamping onto the decall paper would work


I left the saucer relatively plain, but the cup I added some large decall images, went round the top and bottom lips of the cup with red and white spotted decorative tape and added a length of crochet ribbon.


From the paper block I made various flowers using the Die'sire Rose and Sunflower dies (small and large), adding florist wire as I rolled them up.

In the inside of the cup a glued a piece of oasis to allow me to anchor my flowers and decorations to. I added some shop bought cream flowers and red roses again with the florist wire what they came on. I also used some red and white buttons with florist wire attached to decorate gaps with. 


The lady holding the recipy book image I stamped onto white card and coloured using alcohol pens. Added Versamark and clear embossing powder and heated to create a gloss effect. I attached to the back a think lolly pop stick and used this to anchor/stick into the oasis, above the flowers.   


I found a tea bag in my store cupboard and attached the Kitchen Queen coloured stamped image, along with a small red gingham bow and again attached it to a lolly pop stick and anchored to the oasis.

My favourite part of all was the little tin of marmalade...and yes it is real marmalade...I painted the lid red, added one of the round stamped images from the stamp set and sprayed with acrylic varnish to crate gloss, tied some raffia around the jar. I attached the marmalade jar to the cup and oasis with a very strong bonding adhesive from a DIY store.

I cut a Scalloped Tag die from Die'sire in Kraft card and stamped New Home in Black and added a small length of red gingham ribbon. I attached the tag to the cup handle with the same strong bonding adhesive.


I think this has to be my most favourite sample I have made (to date) for Crafter's Companion. 

Don't forget to tune into Create and Craft TV on Sunday 16th June at 12 noon for more products and samples.


There's Kitch and then there's Kitch

My first sample using the Marianne Design Stamps Fabulous Fifties Kitchen was quite plain so I wanted to try and make another sample that pushed myself and the products a little further.


These are the products I used (all available from Crafter's Companion):

  • Marianne Design Pretty Paper Bloc, Happy Days (PK9095)
  • Coredinations Vintage, Centura Pearl Snow White
  • Marianne Collectables (COL1321)
  • Marianne Collectables (COL1321)
  • Marianne Design Charms, Happy Days (JU0893)

 The stamped image of the lady holding the cak is fab and I new I wanted to use her as my starting point. I coloured the stamped image using my alcohol pens in colours that co-ordinated with the backing papers I selected from the paper block: retro print kitchen itensils. Once coloured I cut her out using my craft knife - am not great with scissors.

I made a long narrow envelope from Kraft paper and made an insert for the envelope from the red gingham paper from the same block. I stamped one of the round images from the stamp set in black and coloured red using my alcohol pens and added some clear embossing powder and heated so as to create a shine. I had a fizzy juice bottle top and added the stamped image to the top, covering the brand name and added a small blue bow made from raffia.


Stamped and die cut one of the stamped sentiments and decorated. Added a charm from the pack and added some Versamark and white embossing powder and carefully heated. I love changing the colour of embellishments, so dont be put off when buying them just because you dont lik the colour...it's amazing what you can do with alcohol pens and embossing powders.

I wanted to create further dimension to the card, so from another piece of the red and white gingham paper from the Block - this time showing the pretty edged design - I cut a piece to the required size and with my Hougie Board, scored and folded. I now have a piece of pleated paper, I added this to the card and attached using the new FAB U LOUS Tacky Glu from Collall - I am totally amazed at how it seem to stick everything and goes off really quickly, so no time wasted holding or finding things to weigh it down until it does.

Placed the kraft paper envelope, bottle top and sentiment on top of the pleated paper and added 3 co-ordinating coloured pins.

Selected a piece of blue paper from Coredinations Vinatage. Rounded the corners of the patterened paper and added small white pearls.

I made some bunting...who does'nt love a bit of bunting...from the paper block and mixed and matched  colours and patters. Added a piece of pale blue twine for the bunting.

Stamped the small tin of tomatoes image in black on Kraft paper, coloured using alcohol pens and cut out and attached.

I used Centura Pearl Snow White as my card basis.


I love how the freshness of the colour palette of the card combined with the retro red, but my favourite part of the card has to be th altered bottle top - simple but effective, oh and I also love the dimension of the pleated paper section. I hope you love it too....

Tune into Create and Craft TV on Sunday 16th June at 12 noon for more products and samples.

Kitch Kitchen


Today I am giving you a preview of 2 cards I have made for the crafty people at Crafter's Companion who are now proud stockists of the Marianne Design range. Tune into Create and Craft TV on Sunday 16th June at 12 noon for more products and samples.


Using the following products available from Crafters Companion I set to the task:

  • Marianne Collectable Apron die (COL1321)
  • Marianne Design, Pretty Paper Block - Happy Days (PK9095)
  • Marianne Design, Charms - Happy Days (JU0893)
  • Marianne Collectables - Scalloped Die and Sentiments (COL1321)
I wanted to evoke the kitchness of the 19050's so the ideal place to strat was with the pretty red gingham paper from the paper block and I co-rdinated it with the fabulous apron repeat pattern paper from the same block. I stamped the lady and the cook book image from the stamp set in black onto the red gingham paper.

Used my cricut machine to create 2 frames, 1kraft card and 1 red card, for the centre. Cut out around a section of the lady and tucked the 2 frame behind.

To separate the 2 joined pattrened papers I laid 3 lengths of red raffia. Added some hamdmade small cream roses, a red and white spotted covered button. From a packet of shop bought wooden kitchen embellishments selected the wooden spoon and shaded using my alcohol pens. Tied a raffia bow and added a threaded button to the centre.

The sentiment was stamped in black and I added clear embossing powder, coloured elements of th design with my alcohol pens, die cut it using the co-ordinating die that somes in the pack and added some pearls.

Matted and layered onto red card and the card itself was made from Kraft card.


I just L O V E the kitchness of this stamp set and once I started to use this set my imagination ran wild...keep popping in for more previews and to see just how wild I went. 

Thursday, June 6, 2013

Paisley Pattern


When I set out to make this card I initially wanted to do a White On White card as I have never takled one before...well you can see from the picture of the completed card I chickened out. Oh well maybe next time.


I wanted the two main focal point to be that of a flower and a textured embossed section.

I selected the Die'sire quilling die Sunflower small and large, I just L O V E how the Die'sire quilling dies creates such realistic looking flowers and I am lucky to get such lovely comments.

The backing paper I chose is from Grace Taylor, Vintage Romance stack 12 x 12. I picked the delecate  grey chevron paper and cut to size. Inked the edges with distress inks and rouched up with my disstress tool.

From by Coredinations Roy G Biv, selected a piece of pale grey and passed it through my embossing machine in the Embossalicious Paisley A4 embossing folder. I lightly sanded it with my sanding block also from Coredinations. Cut the piece to size and aged edges with distress inks.

From the Die'sire range I chose the Lace Border 1 die and cut a piece of cream handmade paper and die cut the border. Attached to card with tape and over laped a piece of vintage crochet lace.

I attached the embossed section to the chevron paper with some double sided tape and then with my sewing machine went round the edges in a zig zag stitch so as to create the stitched on look that is so in just now. This was the first time I have tried this technique, as I have been drooling over cards with this effect on the www for ages. I am not fantastic on the sewing machine but was so surprise at how easy it was...am hoocked.


The flower was made using the Die'sire Sunflower small and large and was cut from the same handmade cream paper that I cut the border die from. Used my large embossing ball tool to mould the petals into shape. From by button stash...you can never have too many buttons...I selected a small mother of pearl flower shaped button which picked up the cream and grey tones of the card perfectly. Sewed the centre with some grey cotton thread and attached to the centre of my sunflower. Die cut some various sprigs of leaves and as with the petals used my large embossing ball tool to mould into shape.

For the FULL range of Die'sire Embosslicious embossing folders and Die'sire dies visit the Crafter's Companion website.

My favourite part of the card would have to be the Paisley Embosslaicious A4 embossing folder from Crafter's Companion. This was only passed through my machine once and yet it creates such a crisp and heavily embossed look. 


Although the card didnt end up looking like the card I had in my mind, I am happy with how it looks. By choosing a pale and limited colour palette you can create timeless and classic cards.