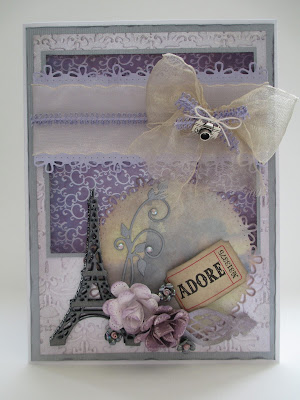
Thursday, October 17, 2013

Lots of mixed emotions

Well it's all official I am heading of to the sunny Cyprus as of January 2014. So, so excited but sad as the realisation of what I am giving up for my new life is setting in fast.

I have had such a wonderful 12 months. I started card making back in October 2011 and 12 months later I have:

  • been a member of the Die'sire Design Team for Crafter's Companion. 
  • been published in Crafter's Inspiration, Issue 3 Winter Edition.
  • been published in Simply Homemade magazine, Issue 35.
  • (and about to published in another mag Dec 2014).
  • been a member of Crafter's Companion Demonstration Team - all be it just for one appearance!
I am so very grateful to Crafter's Companion for taking on such a novice and for all their support and encouragement over the past months. I am so going to miss being part of the 'family' and wish al the DT members and staff every success for the future. I leave with a sad and heavy heart but pleased to know I go with their best wishes, and with some very  nice new friends.

So it's a rest from crafting for me as over the next few months I need to get organised for the big move and settled in to my new home in Cyprus, but rest assured I will be back.

Yia sou x


Tuesday, October 1, 2013

Winter Faerie Poppets

We have all fallen in love with the beautiful Winter Faerie Poppets from the very talented Christine Haworth, well it's time to fall in love with them all over again.

Make sure you tune into Create and Craft TV on Monday 7th October for another amazing products launch from Crafter's Companion.

Here is a sneaky look at 2 of the samples I had fun making using the stamps: 

The Snow Berry Faerie
Products Used:
Snow Berry Faeries Stamped onto Neenah Card
Backing paper: Design set 12, paper 6 colourised
Stamped image coloured with Spectrum Noirs: 
LY2, LY3,LG1,LG2 - LEAVES
LG1, LY1,FS1 - BERRIES
FS7, FS2, FS6 - SKIN
FS2, GT1,FS6, LY1, PP1, P4, HB1 - WINGS
F21, CY2, CG3, LY1, PP2 - SKIRT
LY2, LG1, LG2, GT1, LY1 - JACKET
EB2, EB6, EB3 - HAIR
CR3, PP2, PP3, PP5 - SHOES
EB6, EB3 - BRANCHES


Crystal Star stamp:


Products Used:
Dies: Snowflake and Scalloped Tags
Paper: Centura Pearl Hint of Silver
Spray and Sparkle Iridescent
Spectrum Noirs:
Dress - F58,PP1,CR1,CR2,CR3,CR4,IG1,IG2,IG8,BG4,BG6,BG1
FUR - TN3,EB1,EB2,BG3
HAIR - EB1,TN1,LY1,GB7
BOOTS - LY3,GB2,GB10,GB11
FLOWERS - JG7,DG2,PP1,PP3,CR4
SKIN - FS1,FS4,FS6,FS8,CR2,CR4,CR1
WINGS - PP1,CT4,CG2,CR4,PL1,LY1,LY3,LG2


Hope you will be watching and spending.

Friday, September 20, 2013

Road Trip to Kelso

Been super busy this week preparing for my first official demonstrator with Crafter's Companion. So tomorrow I'll be at Mayfield Garden Centre 10 till 4 showcasing the fabulous ebosser along with fab new The Snowman and Snowdog, stamps and dies along with the Father Christmas stamps.

Next week I promise I will do a post a day for the samples pictures below . . .

Gift Boxes:


Cards:


The main focus of my demo samples are based around setting your table for Christmas dinner: decorated straws for kids, decorated bottle of wine, napkin rings, crackers, wine glass decorations and name place settings:


Wish my luck and week checking in next week when I'll give you all my hints, tips and products used for the above projects. Have a great weekend x 


Friday, September 6, 2013

One Last Visit

So it's back to where it all began, Paris.

For my last card I tried to capture everything from our Journey...


I've taken pieces of the papers and created stamps to keep as a momento.

This time I used from Crafter's Companion website:

Dies: Marianne Craftables - Ivy Corner (CR1253), Eiffel Tower (CR1220), Stamps (CR1223), Circle and Flower Stitch (CR1248). Creatables - Classic Mailbox (LR0275). Collectables - Cutting Dies and Clear Stamps Everyday (COL1324)
Charms: Marianne Travel (JU0894)
Ribbon: Marianne Rose are Red (JU0897)
Paper: Marianne Romatic Journey (PK9096)
Folder: Emossalicious Perfect Paisley A4


Thank you for being my travel companion, it's been a pleasure. I hope you have enjoyed the journey and my cards and hope you will have a go at some of the techniques I've tried. If all else fails tune into Create and Craft on 5th Seeptember to my samples and those created by other team members.

Au Revoir...for now.

But the Journey doesn't end here... I wanted to see what other project I could use this amazing selection of dies, embellishments and papers along with my stash. Whilst our shopping one day 'something' caught my eye that I could alter using these products....I would so LOVE to show you the end result but fingers crossed it's going to appear in a magazine....so like me you will just have to wait...but I PROMISE I will blog it as soon as it hits the shelves.

So this is the last of my set of samples for the show on Create and Craft TV on 8th September 2013 at 9am and 12 noon.

Thursday, September 5, 2013

Lavender Fields

So we have been on all those Romantic Journey's and we need somewhere to store all those love letters and postcards we collected along the way.


I took one of those Papier Mache books and set about decorating the inside and outside.

I didn't have a 'plan' with this one, which is not like me. I pretty much got as much as I could out of my stash that I though matched colour wise, texture and style and just set about,cutting, layering, embellishing until I was happy with how it looked. 

From Crafter's Companion store cupboard I used:


Charms: Marianne, Travel JU0894
Lace: Marianne, Vintage Fleur JU0898
Folders: Die'sire, Regency Damask 8x8
Paper: Marianne Romantic Journey (PK9096)
Marianne Creatables Dies: Anja's Small Corner (LR0214), Anja's Vintage Swirls (LR0271), Anja's Vintage Ornaments 2 (LR0270), Classic Mailbox (LR0275)
Marianne Craftables Dies: Ivy Corner (CR1253), Circle and Flower Stitch (CR1248)
Marianne Collectables Dies: Banner and Text Everyday (COL1248)

I love that the Marianne products have helped me use paper in different ways - I've torn paper to expose layers underneath and this time I turned a corner over and let flowers spill out from underneath. So easy to do.


So we now have a perfect place to keep all those romantic letters and postcards.


So it's back to Paris tomorrow to catch our flight back to the UK so we can tune into the show on Create and Craft TV, 8th September where 'hopefully' you'll be able to see my samples on the big screen.

Extended Stay

So yesterday we arrived back in the Romantic Paris and have decided to stay another day.


I made this tag shaped card using the green and brown patterned paper from the Romantic Journey and used that as my colour story for this card. I just HAD to use the Eiffel tower die again, but if you cut it in brown card and add gold gilding wax it looks like the real thing...


I love how using the Anja's Vintage Decoration on either side of the card and plan on using this technique again. From my crafty stash I used some chipboard letters to spell out the destination, an easy and effective way to add dimension.

I used from Crafter's Companion :

Paper: Romantic Journey (PK9096), Centura Pearl Snow White and Coredinations Roy G Biv
Dies: Craftables - Eiffel Tower (CR1220), Craftables - Cirlce and Flower Stitch (CR1248), Creatables - Anja's Vintage Ornaments 3 (LR0273), Creatables - Anja's Vintage Swirls (LR0271), Anja's Vintage Decoration (LR0269)
Stamps/Dies: Collectables - Cutting Dies & Clear Stamps, Banner & Text Everyday (COL1324)


So it's time to escape from the hustle and bustle of Paris and head out to the Lavender Fields, see you there tomorrow.

Over the next few days I will be posting all the samples I have made for the show on Create and Craft TV on 8th September 2013 at 9am and 12 noon.

Wednesday, September 4, 2013

La Tour Eiffel

So we started our Romantic Journey with Marianne and now we are back after a short stop over in Japan.

The Marianne Eiffel Tower die is a very delicate die but of you cut it more than once it's easy enough to layer up. Add some gold gilding wax and you create the iron effect.


To create this card I used the following products available from Crafter's Companion:
Folders: Die'sire Regency Damask 8x8
Papers: Romantic Journey Bloc (PK9096), Centura Pearl Hint of Silver & Coredinations Roy G Biv
Dies: Craftables - Eiffel Tower (CR1220), Craftables - Circle and Flower Stitch (CR1248), Craftables - Border Stitch (CR1250), Anja's Vintage Ornaments 3 (LR0273) and Anja's Vintage Swirls (LR0271)
Charms: Travel (JI0894)


Over the next few days I will be posting all the samples I have made for the show on Create and Craft TV on 8th September 2013 at 9am and 12 noon.

Stairway to Paradise

The image of the the couple walking up the stair case is a romantic image that suits so many celebrations, especially anniversaries. 

From my crafty stash I used the Marianne stamp dies and cut the paper various times - you will need at least 2 pages to create this affect. Use you alcohol pens and gilding wax to add definition to glorious mailbox. 

Had fun with my first attempt at using Flower Soft - just added some to one of the frames on the flowers either side of the pathway.    


From Crafter's Companion I used:
Dies: Craftables - Stamps (CR1223), Craftables - Circle and Flower Stitch (CR1248), Creatable - Classic Mailbox (LR0275)
Paper: Romantic Journey Bloc (PK9096)Stamps/Dies: Collectables - Cutting Dies and Clear Stamps (COL1320 & COL1321)


I think I have fallen in LOVE with this Mailbox die...have you?

So where are we off to tomorrow I hear you ask? How does Paris take you? 

Over the next few days I will be posting all the samples I have made for the show on Create and Craft TV on 8th September 2013 at 9am and 12 noon.

Tuesday, September 3, 2013

Cherry Blossom

The delicate scent of the falling cherry blossom creates such a delicate and beautiful scene. So taking inspiration from the Japanese scene paper I set about 'trying' something a little different. If you are like me and spend hours surfing Pinterest looking for inspiration then I think this technique of tearing paper to expose something underneath is so, so pretty. All you need to do is tear carefully and curl under the edges and you have a very different look.


I used the following products available from Crafter's Companion:


Dies: Collectables - Cutting Dies and Clear Stamps (COL1324), Craftables - Circle and Flower Stitch (CR1248), Creatable - Anja's Vintage Swirl (LR0271) and Creatables - Anja's Vintage Ornaments 2 (LR0270)
Folders: Die'sire, Rose Garden 8x8
Paper: Romantic Journey Bloc (PK9096)


I teamed the flowers I hand made with some shop bought along with some lace and pearls. It's such an easy technique and one I will more than likely use again and again.

So that's number 2 of 7, tomorrow we are off on another Journey, I wonder where it will be...

Over the next few days I will be posting all the samples I have made for the show on Create and Craft TV on 8th September 2013 at 9am and 12 noon.

Let's Go on a Romantic Journey

When I saw the images and colour palette of the the pretty Romantic Paper Bloc from Marianne I couldn't wait to get started. Being part of the Die'sire DT I get to work with some amazing dies and the imaginative Mailbox die fits the bill perfectly when teamed together with the theme of the paper bloc.


I used the following products all available from Crafter's Companion...get them while you can:


Paper: Romantic Journey Bloc (PK9096), Coredinations Roy G Biv, Centura Pearl Accents
Ribbon: Roses are Red (JU0897)
Stamps/Dies: Collectables - Banner & Texts Every Day (COL1324)
Charms: Travel (JU0894)
Dies: Craftables - Circle and Flower Stitch (CR1248) & Creatables - Classic Mailbox (LR0275)

Over the next few days I will be posting all the samples I have made for the show on Create and Craft TV on 8th September 2013 at 9am and 12 noon.

Sunday, August 25, 2013

Sent From Above

I recently posted a couple of images I was playing with for a Christening card. Well I'm happy to say the girl who ordered the card loves it and to be honest quite happy with how it turned out.


I used Linen, Satin, Tea Rose, Almond, Putty and Dusty Pink from Skin Tones 1.
For the balloon I used Butter Cup, Lemon and Yellow.
The hair I used Sandstone and Caramel.
For the frilly pants I used Patel Pink, Dusty Pink and Rose Pink.

The stamped image is Sent from Above stamp from Tina Wenke which I stamped onto Neenah card in Pitch Black Adirondack.


The lovely papers where the inspiration for the colour palette and obviously the main colour was going to pink and that is always going to be the focal colour i wanted a more muted ice cream tones to compliment it. I used Graphic 45, Baby to Bride Collection, Always on My Mind and Unforgettable along with Coredinations card stock.

The tag and label die cut is from Crafter's Companion, Scalloped Tags and was cut using Centura Pearl Hint of Gold.

The focal die is from Spellbinders Nestabilities Floral Ovals.

The Christening sentiment stamp from www.stampingallday.com and the smaller sentiment is from Just Rite.

Tim Holtz Tattered Straw distress ink on the edges of all bar the pink matt and layers.

Floral flourish die cut in green vellum using Marianne Creatables Die, Anja's Vintage Swirls.

Ribbon, mulberry flowers and some pink pearl just finish the card off. 


Friday, August 23, 2013

A Spot of Colouring In

I got distracted today, but just for a short while. I'm suppose to be making a Christening card for a customer and couldn't decide between two images. So rather than just pick one and colour I just had to colour the two.

I have a selection of Pro Markers and realised that mu collection was lacking in skin tone colours suited to a baby skin. So off I popped to my local craft store but unfortunately they didn't have the 'normal' Promarkers but the Flex Markers, so reluctantly I purchased them. As soon as I got home I opened the packet and tested them on a scrap piece of paper and wow oh wow they are amazing. Blending them is a dream and they work fantastically mixing and matching between the normal and the Flexi's.

So I started with the Sent from Above stamp from Tina Wenke which I stamped onto Neenah card in Pitch Black Adirondack.


I used Linen, Satin, Tea Rose, Almond, Putty and Dusty Pink from Skin Tones 1.
For the balloon I used Butter Cup, Lemon and Yellow.
The hair I used Sandstone and Caramel.
For the frilly pants I used Patel Pink, Dusty Pink and Rose Pink

The second image is a free image I found on the internet - sorry cant remember where.


I coloured her skin tones again from Skin Tones 1. I used Patel Pink, Dusty Pink and Rose Pink to colour her clothes. I used Linen, Almond, Sandstone and Caramel for her hair.

Eventually I have decided to go with the girl with the balloon for the card and I will post a blog when done.


Tuesday, August 20, 2013

On a bicycle made for two

So what do you do when you get that dread request to make a card for a man? If your first reaction is panic then don't. Try and find out if they have an interest or a hobby. For this card the husbands who's birthday the card was for love cycling so I used that I the inspiration.


Kept with the masculine black and white theme and love hounds tooth check and inked with Pumic Stone Tim Holtz Distress Inks to create a shadowed edge.

Sentiment and label stamped in black and embossed and coloured in red, by hand some red elements.


Used an elegant frame die from Sizzix in black card that has a gloss stripe - used it also as a matt and later and you can just see the light hitting the stripe at the top if the card.

The main focal point of the card is the bicycle. I chose a tandem as I loved that it worked so well with the fact that is from a wife to her husband. I used a digi stamp from Fancy Dog Studio - you not only get this but lots of others so definately a great addition to my stash. Printed onto super smooth, coloured with Pro Markers and carefully cut out using my craft knife.


Embellished with some quilted metallic and glitter love hearts from my stash. 

Hopefully the Husband likes it by I know the Wife loves it, phew another happy customer.   


Thursday, August 15, 2013

Perfect In Pink

Using the Ulti Bags Board from Crafter's Companion the possibilities are endless. To promote the board to the German market I was asked by Crafter's Companion to design a few bags using the board. The samples where shown this week on HSE24 (German shopping channel) and have been used in a DVD in German that accompanies the Ultimate Pro. For the DVD I made a step by step for both the samples so I've decided to share these with you.

Yesterday was all about Christmas, so today I'm going to show you how to make a cute pink handbag gift bag...


Products Used:
·         Floral pink card stock
·         Scissors
·         Craft knife
·         Scoring tool
·         Extra strong double sided tape
·         Spray and Slide
·         Ulti Bag Embossing Board
·         Collall Silicon glue
·         Collall Tacky-Glue
·         Embellishments, brads and raffia
·         Ulti Make Pro – Bow Maker

1.      Spray selected patterned card stock with Spray and Slide

2.     Place patterned card stock onto board using sticky tape to secure to board to stop it from moving. Trace around the bag design with embossing tool.


 3.    When outline complete, cut out.

4.     Fold all folds as indicated.


5.     Add Collall Tacky-Glue to the areas indicated with an “X” on the outside and stick.


6.     Add Collall Tacky-Glue to the areas indicated with an “X” on the inside and stick.


7.     Add Collall Tacky-Glue to the areas indicated with an “X” on the inside and then the outside and stick.


8.    The Handbag Gift Bag is now ready to be decorated.


9.     To create the bag handles cut 3 equal lengths of co-ordinating raffia and plait to the desired length. Attach to the top inside flap of the bag with strong tape.


10.  On the inside of the bag flap, find the centre point and pierce a small hole with a sharp pointed tool.


11.  Insert the brad from the outside. Attach a small piece of hook and loop tape to the back of the brad and to the front of the bag and close. This allows the bag to open and re close.

12.  Add co-ordinating floral embellishments of your choice.


13.  Using a piece of the patterned card stock trace around the smallest scalloped tag and cut out.


14.   Using your Ultimate Pro Bow Maker tie a small bow in the same raffia as used for the bag handle and glue to the tag. Attach tag with Collall Tacky-Glue to the gift bag.